Buttons Sets are seperate pages for buttons. Each set shows itself only. Most people only have "default" and try to squash everything on to that one page of buttons. You can have as many Buttons Sets as you want and you can use buttons or triggers or aliases to switch between the Buttons Sets.
Creating a Buttons Set is easy but it requires some thought about naming your Buttons Set or you end up with a long complicated name that are hard to remember how to spell. The names of a Buttons Set do not have to be a single word but as I have discovered this can cause memory problems later, my memory not Blowtorch's memory.
To create a new Buttons Set press on Blowtorch menu and select Buttons Sets. A list of all your current Buttons Sets will be displayed along with two buttons, "NEW SET" and "DONE". Since we want to create a new Buttons Set press the "NEW SET" button. We need to give it a name and then press done. For this part of the turorial I am going to assume we are creating the Buttons Set for campaigns and quests and so CP_Q is a good name for this Buttons Set.

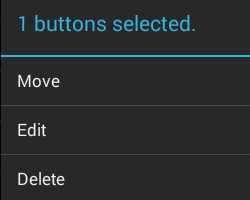
After you press done you will go straight in to the Buttons Set editor. We are going to add 9 buttons to start with, to add a button press any where on the screen. For now the most important button we are going to add is the one that loads the "default" Buttons Set. Once you have added the 9 buttons press on one of them again, a menu will popup with 3 options, Move, Edit or Delete.
We are going to use the Edit option and so we press on Edit. A new menu appears with 3 tabs, Click, Flip and Advanced. Click is the default action of a button and it is what we want to set. In the "Label" put "Back" and in the "CMD:" put ".loadset default" and then press done and then press the green tick at the top right of the screen.

We should now have 9 buttons, one of which is labelled back and if you press it it should take you back to the default button set.
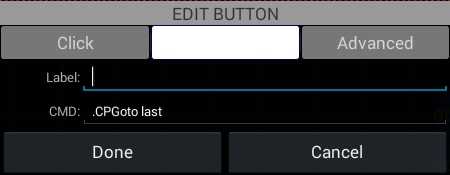
The next step is to bind the CPGoto, CPRGoto and CPAT commands to buttons. If you are not in the button editing mode use the Blowtorch menu to select Button Sets and then press on CP_Q, a mini menu will slide from the left, one of the images on this menu is a set of gears, click on them to go in to editing mode. Press on one of the blank buttons you made earlier and select "EDIT" from the menu. In to "Label:" put "CP F/L" and into "CMD:" put ".CPGoto first". Next press the "Flip" tab, we can leave the label blank as we already labeled the normal version of this button. In to the "CMD:" section put ".CPGoto last". Now press "Done".
That handled the button for moving to the first or last area of an area Campaign but we still need to add a button for creating a list of rooms for room campaigns. Again enter button editing mode, if you aren't still in it, and press on another blank button. In to "Label:" put "CPR F/L" and in to the "CMD:" put ".CPRGoto first". Next got to the "Flip" tab and in "CMD:" put ".CPRGoto last" and press "Done".
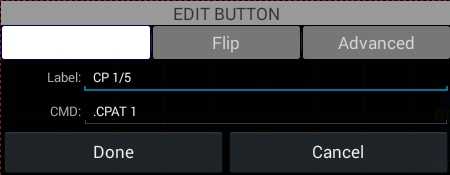
Next we need four similar buttons, the "Label:" will be "1/5", "2/6" "3/7" and "4/8" and the "CMD:" will be ".CPAT 1" with the flip "CMD:" as ".CPAT 5", the next button is 2 and 6, then 3 and 7 and lastly 4 and 8.
To finish of this button set we need two more buttons, the first to request a campaign and also to get the information about it, the second to check the campaign progress. In to the first button's "CMD:" put "cp request" and in the flip "CMD:" put "cp info". In the second button's "CMD:" put "cp check".
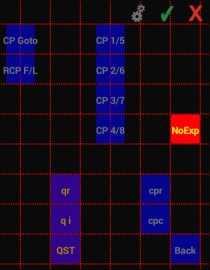
You should now have 9 buttons, which look something like the example below. I also have a button for "quest request", "quest info" and for the ".QST" command as well as a button to toggle noexp.
In order to make a Button Set easier to access, doing it from the menu is counter productive, you need to add a button to your default Button Set. Use the Blowtorch menu to go to button sets, select default, edit it with the cogs mini menu entry and add a button with ".loadset CP_Q" in the "CMD:" section.
So to test all your hard work out you need to go to your favourite campaign giver, run 2e, from recall is a quick to reach campaign/quest master. Press your brand new "cp request" button, followed by your "cp check" button. If you have correctly installed the Quest and Campaign helper plugin you should get a list of areas wihh the mobs in those areas OR if you got a room campaign a list of rooms with the mobs in those rooms.
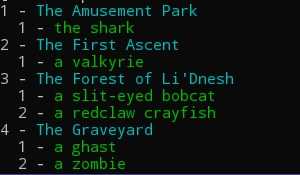
Now because this is an area campaign we are going to press the "CP F/L" button, normal press do not swipe. Now in my case this would run me to "The Amusement Park" by the shortest route that the mapper knows. If you have not taught the mapper how to get to your campaign area it will report that it cant find the path to the room number. Teaching your mapper the paths to areas is covered later in this turotial.
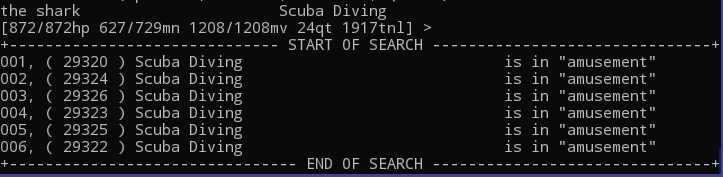
Now that we are in the area, in this case "The Amusement Park" we need to look for "the shark". As you can see from the screen shot it has a number 1 to the left of it, this is number we use with ".CPAT" but we already have 4 buttons set up that handle numbers 1-8 so all we have to do is press "CP 1/5", again normal press do not swipe. The campaign helper now initiates the "hunt trick" to determine the room that your campaign target is in. It also sets the variable/alias TARGET to shark, this allows you to set up buttons in your combat button set that use TARGET as the target of what ever attack you wish to start combat with.
Once the hunt trick has determined the name of the room your campaign target is in it tries to generate a list of rooms that the mapper knows. For area campaigns it only looks for rooms in the area you are in.
With the room list now populated you can now use the .MapperGotoListNext .MapperGotoListPrevious coammnds, which you could also have bound to a button. The two functions will try to take you to the next or previous room in the list. The only time they work differently is if you have not yet been to the first or last room on the list, in that case they attempt to take you to the first or last room in the generated list.
In order for the mapper to work properly it needs to know the shortest routes between rooms and areas. Just like you didn't know the shortest path between two areas when you started playing the mapper has no ideas about those paths either until you walk them or create the custom exits, aka cexits, for them.
When you first start off with the mapper you will be tempted to use the rt coammand, however because the rooms fly by so quickly as you move the mapper is unable to capture the room data correctly and this will result in gaps in the path between rooms and areas. You will have to walk the rooms between areas maunally. This takes time but the time that is spent doing this will be saved later when the mapper calculates routes between areas. The mapper can and will use any portal that it is taught to use. By portals I mean the ones you hold and enter, like the academy portal or the apple press that leads to Land of Legends. It can also be taught to use the clan exits to areas, for example Boot have a clan exit to "Storm Mountain". Teaching the mapper all those paths will mean that you take the shortest possible path to your destination area.